SSH 链接到Ubuntu
$ ssh tomcat@221.221.xxx.xxx
为什么要配置网站链接为HTTPS?
1. HTTPS相对于HTTP链接通道更为安全,特别是针对有付款和信息交换的网站。
2. 大多数浏览器对两种链接方式的显示都有明显的区分,比如Chrome、Safari、IE。
3. 相对于以前只能每年花一定的费用,目前有免费的HTTPS提供商 ,比如sslforfree.com
没有绝对安全的网络链接,也不是所有的网站都需要HTTPS,比如有些展示类的网站,没有用户交互信息,也不在意客户访问量,就不一定需要这个配置。
本文提供一种免费的HTTPS的配置方法,供所需参考
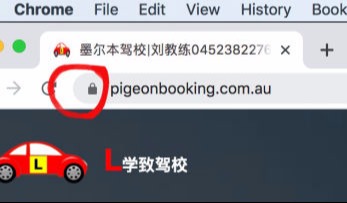
配置了HTTPS链接的网站,以Chrome浏览器为例,链接域名地址前面会显示一把小锁,表示该网站是安全链接。对于追求完美的网站客户来说,这是一种访问鼓励。直接点击 看一下效果
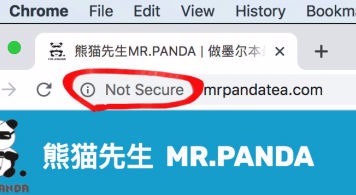
默认HTTP链接的网站,以Chrome浏览器为例,链接的域名地址的前方显示一个感叹号,并有Not Secure的提醒,这个提醒对于有网络安全焦虑的客户来说是一种阻挡,会减少网站的客户访问量。直接点击 看一下效果
$ ssh tomcat@221.221.xxx.xxx
$ sudo apt-get update
$ sudo apt-get install software-properties-common
$ sudo add-apt-repository universe
$ sudo add-apt-repository ppa:certbot/certbot
$ sudo apt-get update
$ sudo apt-get install certbot python3-certbot-apache
方法一:$ sudo certbot certonly --standalone -d pigeonbooking.com.au -d www.pigeonbooking.com --dry-run
方法二:$ sudo certbot certonly --webroot -w /***/tomcat9/webapps/*** -d pigeonbooking.com.au
Certbot默认安装后是到期后(目前是三个月)可以自动更新的,但有时候会自动更新失败,特别是web服务器使用了安全管理框架后,比如使用了SpringSecurity的框架,或者设置了Tomcat的访问限制。如果没有访问限制通常是没有问题的。
$ sudo certbot renew --dry-run
或者为了省事,也可以配置安全框架,将certbot所需的目录和文件的权限完全放开也行。
自动更新失败,或者是网站设置了安全访问限制的手动更新:
$ sudo certbot certonly --webroot -w /*** -d pigeonbooking.com.au
$ sudo certbot certonly --standalone -d pigeonbooking.com.au
如果想简单操作,可以暂时移除原来的webapp/***,放一个不带权限限制的目录,获取新的证书后再把目录替换为原来的。
$ certbot --cert-name www.pigeonbooking.com.au -d www.pigeonbooking.com.au
证书获取和增加容易,但如果从HTTPS切换回HTTP,很多浏览器有记忆功能,客户端一旦自动从http跳转https,如果再转回http,浏览器通常会报错,说该链接不安全。就像吃惯了大米白面,再回头让吃高粱窝头,难啊!
> sudo cp ready.conf newdomain.conf
> sudo vi newdomain.conf
> 修改对应的域名和目录
> sudo cp -R /home/magento/newdomain/ /var/www/
> sudo apache2ctl configtest --用这个命令检查配置文件是否有错误
> sudo a2ensite newdomain.conf
> sudo service apache2 reload
> sudo systemctl restart apache2
> sudo systemctl status apache2
> sudo certbot --apache --然后按照提示做
REF:
https://www.digitalocean.com/community/tutorials/how-to-set-up-apache-virtual-hosts-on-ubuntu-20-04
Select the menu Window > Preferences > General > Keys and assign a shortcut key for ‘Compare with Other Resource‘:I’m using Ctrl+Shift+C, when in Eclipse while cursor focus on the left Project Explorer.
1. 更新安全证书直接运行 :sudo certbot renew --dry-run 或者参考网站上证书更新
2. 如果更新有问题,可以执行如下步骤重新做证书,先分别下载证书,再合并证书,在如下这两个步骤之前,可以 考虑先将tomcat的Https配置修改为http的,修改server.xml和web.xml两个文件
(1) # sudo certbot certonly --webroot -w /var/lib/tomcat9/webapps/ROOT -d pigeonbooking.com.au -d www.pigeonbooking.com.au
(2) # sudo certbot certonly --webroot -w /var/lib/tomcat9/webapps/amala -d amala.com.au -d www.amala.com.au
(3) # sudo certbot certonly --standalone -d pigeonbooking.com.au -d www.pigeonbooking.com.au -d amala.com.au -d www.amala.com.au
META NAME="ROBOTS" CONTENT="NOINDEX,FOLLOW":不许抓取本页,但是可以顺着本页抓取索引别的链接
META NAME="ROBOTS" CONTENT="INDEX,FOLLOW, archive" 因此,如果我们对于这一部分把握不准的话,可以直接写上上面的这一行命令,或者是直接留空。
确定域名在 https://search.google.com/ 上面三种情况都已经验证完毕
// iptable
iptables -t nat -A PREROUTING -i eth0 -p tcp --dport 80 -j REDIRECT --to-port 8080
// Secondly, run sudo apt-get install iptables-persistent, and follow the prompts. When it asks to save the current rules, hit "Yes" at both prompts. Now, on reboots, your iptables rules will be restored.
// install jdk8
apt-get install software-properties-common
sudo add-apt-repository ppa:webupd8team/java
sudo apt-get update
sudo apt-get install oracle-java8-installer
javac -version
成功启动MongoDB后,再打开一个命令行窗口输入mongo,就可以进行数据库的一些操作。
输入help可以看到基本操作命令:
show dbs:显示数据库列表
show collections:显示当前数据库中的集合(类似关系数据库中的表)
show users:显示用户
use :切换当前数据库,这和MS-SQL里面的意思一样
db.help():显示数据库操作命令,里面有很多的命令
db.foo.help():显示集合操作命令,同样有很多的命令,foo指的是当前数据库下,一个叫foo的集合,并非真正意义上的命令
db.foo.find():对于当前数据库中的foo集合进行数据查找(由于没有条件,会列出所有数据)
db.foo.find( { a : 1 } ):对于当前数据库中的foo集合进行查找,条件是数据中有一个属性叫a,且a的值为1
MongoDB没有创建数据库的命令,但有类似的命令。
如:如果你想创建一个“myTest”的数据库,先运行use myTest命令,之后就做一些操作(如:db.createCollection('user')),这样就可以创建一个名叫“myTest”的数据库。
数据库常用命令
1、Help查看命令提示
help
db.help();
db.yourColl.help();
db.youColl.find().help();
rs.help();
2、切换/创建数据库
use yourDB;当创建一个集合(table)的时候会自动创建当前数据库
3、查询所有数据库
show dbs;
4、删除当前使用数据库
db.dropDatabase();
5、从指定主机上克隆数据库
db.cloneDatabase(“127.0.0.1”); 将指定机器上的数据库的数据克隆到当前数据库
6、从指定的机器上复制指定数据库数据到某个数据库
db.copyDatabase("mydb", "temp", "127.0.0.1");将本机的mydb的数据复制到temp数据库中
7、修复当前数据库
db.repairDatabase();
8、查看当前使用的数据库
db.getName();
db; db和getName方法是一样的效果,都可以查询当前使用的数据库
9、显示当前db状态
db.stats();
10、当前db版本
db.version();
11、查看当前db的链接机器地址
db.getMongo();
Collection聚集集合
1、创建一个聚集集合(table)
db.createCollection(“collName”, {size: 20, capped: 5, max: 100});
2、得到指定名称的聚集集合(table)
db.getCollection("account");
3、得到当前db的所有聚集集合
db.getCollectionNames();
4、显示当前db所有聚集索引的状态
db.printCollectionStats();
用户相关
1、添加一个用户
db.addUser("name");
db.addUser("userName", "pwd123", true); 添加用户、设置密码、是否只读
2、数据库认证、安全模式
db.auth("userName", "123123");
3、显示当前所有用户
show users;
4、删除用户
db.removeUser("userName");
其他
1、查询之前的错误信息
db.getPrevError();
2、清除错误记录
db.resetError();
查看聚集集合基本信息
1、查看帮助 db.yourColl.help();
2、查询当前集合的数据条数 db.yourColl.count();
3、查看数据空间大小 db.userInfo.dataSize();
4、得到当前聚集集合所在的db db.userInfo.getDB();
5、得到当前聚集的状态 db.userInfo.stats();
6、得到聚集集合总大小 db.userInfo.totalSize();
7、聚集集合储存空间大小 db.userInfo.storageSize();
8、Shard版本信息 db.userInfo.getShardVersion()
9、聚集集合重命名 db.userInfo.renameCollection("users"); 将userInfo重命名为users
10、删除当前聚集集合 db.userInfo.drop();
聚集集合查询
1、查询所有记录
db.userInfo.find();
相当于:select* from userInfo;
默认每页显示20条记录,当显示不下的情况下,可以用it迭代命令查询下一页数据。注意:键入it命令不能带“;”
但是你可以设置每页显示数据的大小,用DBQuery.shellBatchSize= 50;这样每页就显示50条记录了。
2、查询去掉后的当前聚集集合中的某列的重复数据
db.userInfo.distinct("name");
会过滤掉name中的相同数据
相当于:select distict name from userInfo;
3、查询age = 22的记录
db.userInfo.find({"age": 22});
相当于:select* from userInfo where age= 22;
4、查询age>22的记录
db.userInfo.find({age: {$gt: 22}});
相当于:select* from userInfo where age>22;
5、查询age<22的记录
db.userInfo.find({age: {$lt: 22}});
相当于:select* from userInfo where age<22;
6、查询age>= 25的记录
db.userInfo.find({age: {$gte: 25}});
相当于:select* from userInfo where age>= 25;
7、查询age<= 25的记录
db.userInfo.find({age: {$lte: 25}});
8、查询age>= 23 并且 age<= 26
db.userInfo.find({age: {$gte: 23, $lte: 26}});
9、查询name中包含 mongo的数据
db.userInfo.find({name: /mongo/});
//相当于%%
select* from userInfo where name like ‘%mongo%’;
10、查询name中以mongo开头的
db.userInfo.find({name: /^mongo/});
select* from userInfo where name like ‘mongo%’;
11、查询指定列name、age数据
db.userInfo.find({}, {name: 1, age: 1});
相当于:select name, age from userInfo;
当然name也可以用true或false,当用ture的情况下河name:1效果一样,如果用false就是排除name,显示name以外的列信息。
12、查询指定列name、age数据, age>25
db.userInfo.find({age: {$gt: 25}}, {name: 1, age: 1});
相当于:selectname, age from userInfo where age>25;
13、按照年龄排序
升序:db.userInfo.find().sort({age: 1});
降序:db.userInfo.find().sort({age: -1});
14、查询name = zhangsan, age = 22的数据
db.userInfo.find({name: 'zhangsan', age: 22});
相当于:select* from userInfo where name = ‘zhangsan’ and age = ‘22’;
15、查询前5条数据
db.userInfo.find().limit(5);
相当于:selecttop5* from userInfo;
16、查询10条以后的数据
db.userInfo.find().skip(10);
相当于:select* from userInfo where id not in (
selecttop10 * from userInfo
);
17、查询在5-10之间的数据
db.userInfo.find().limit(10).skip(5);
可用于分页,limit是pageSize,skip是第几页*pageSize
18、or与 查询
db.userInfo.find({$or: [{age: 22}, {age: 25}]});
相当于:select* from userInfo where age = 22 or age= 25;
19、查询第一条数据
db.userInfo.findOne();
相当于:selecttop1* from userInfo;
db.userInfo.find().limit(1);
20、查询某个结果集的记录条数
db.userInfo.find({age: {$gte: 25}}).count();
相当于:selectcount(*) from userInfo where age>= 20;
21、按照某列进行排序
db.userInfo.find({sex: {$exists: true}}).count();
相当于:selectcount(sex) from userInfo;
索引
1、创建索引
db.userInfo.ensureIndex({name: 1});
db.userInfo.ensureIndex({name: 1, ts: -1});
2、查询当前聚集集合所有索引
db.userInfo.getIndexes();
3、查看总索引记录大小
db.userInfo.totalIndexSize();
4、读取当前集合的所有index信息
db.users.reIndex();
5、删除指定索引
db.users.dropIndex("name_1");
6、删除所有索引索引
db.users.dropIndexes();
修改、添加、删除集合数据
1、添加
db.users.save({name: ‘zhangsan’, age: 25, sex: true});
添加的数据的数据列,没有固定,根据添加的数据为准
2、修改
db.users.update({age: 25}, {$set: {name: 'changeName'}}, false, true);
相当于:update users set name = ‘changeName’ where age= 25;
db.users.update({name: 'Lisi'}, {$inc: {age: 50}}, false, true);
相当于:update users set age = age + 50 where name = ‘Lisi’;
db.users.update({name: 'Lisi'}, {$inc: {age: 50}, $set: {name: 'hoho'}}, false, true);
相当于:update users set age = age + 50, name = ‘hoho’ where name = ‘Lisi’;
3、删除
db.users.remove({age: 132});
4、查询修改删除
db.users.findAndModify({
query: {age: {$gte: 25}},
sort: {age: -1},
update: {$set: {name: 'a2'}, $inc: {age: 2}},
remove: true
});
db.runCommand({ findandmodify : "users",
query: {age: {$gte: 25}},
sort: {age: -1},
update: {$set: {name: 'a2'}, $inc: {age: 2}},
remove: true
});
update或remove其中一个是必须的参数; 其他参数可选。
作者:你本来就很牛
链接:https://www.jianshu.com/p/0a52c672ae78
來源:简书
著作权归作者所有。商业转载请联系作者获得授权,非商业转载请注明出处。
(1). Backup and Restore
i. Backup whole database: $CONTENT$gt;mkdir mongobak $CONTENT$gt;cd mongobak $CONTENT$gt;mongodump
Resutl:
Bakpath: ./dump/[databasename]/[collectionname].bson
ii. Backup the specified database
$CONTENT$gt;mongodump -d omtdb
Result:
Bakpath: ./dump/[databasename]/[collectionname].bson
iii. Database restore
$CONTENT$gt;cd mongobak
$CONTENT$gt;mongorestore --drop :// restore all data and drop the data in db. $CONTENT$gt;mongorestore -d omtdb --drop //just restore the omtdb
$CONTENT$gt;mongorestore -d omtdb –c userMessage –drop ;// just restore collection
iv. Export data from Mongodb
$CONTENT$gt;mongoexport -d omtdb -c userMessage -q {} -f _id,name,email,datetime,notes --type=csv > pages.csv
$CONTENT$gt;mongoexport -d omtdb -c historyPriceVO -q {} --type=json >historyPriceVO.json
v. Import data to Mongodb
$CONTENT$gt;mongoimport -d omtdb -c page --type csv --headerline --drop < csvORtsvFile.csv ; // type include: csv,json,tsv
$CONTENT$gt;mongoimport -d omtdb -c historyPriceVO -j 4 --type json --drop
附录另外一种备份方式更实用:
1. ># mongodump --archive=bookme.archive --db bookme
2.># mongorestore --archive=bookme.archive --drop
3.关闭mongodb:># mongo > use admin switched to db admin > db.shutdownServer()

可以直接到比较流行的域名服务提供商 Godaddy 查询自己喜欢的域名是否已经被注册,如果没有那么可以直接下单购买。通常一个普通域名一年的服务费在$20左右。域名建议:
1. 域名要有一定的含义,且易被理解,不要太长,一般15个字母以内比较好
2. 不用刻意追求和关键字相关,这个域名和最终的SEO没有任何程序上的关系
物理服务器提供商目前全球最大的应该是 亚马逊 ,但不一定是最适合您的。比如专门只做物理服务器的 Linode 也不错, 物理服务器的位置在亚太地区,欧美以及悉尼都有,用户可以根据自己的客户范围做选择。
对于普通的网站客户来说主要关注开发者的两件事情:
1. 开发周期:在合理的收费,保证满足需求的情况下,周期越短越好,一般项目周期在1~3个月,网站越复杂周期越长,费用越高。
2. 网站的自适配设计:前端网页除了美观大方外,最重要的就是要适配不同的终端,比如台式机,平板,手机,以及不同终端上的浏览器的版本。
